This is a dream come true, bucket list road trip journey for any nature loving and landscape admiring adventurer. The Canadian Rocky Mountains are just something special and we are so delighted to share with you everything you need to know for your very own Ultimate Canadian Rocky Mountains Motorhome Road Trip.

We started our Ultimate Canadian Rocky Mountains Motorhome Road Trip in Vancouver, simply because it is an easy and reasonably priced location to fly in and out from, plus hire a Motor Home / RV / Camper. We allowed 3 weeks to do the loop from Vancouver, to Jasper and Banff and return. We booked our flights here.
We booked our Motorhome Hire through Cruise Canada, and this was purely a price and availability decision. Once Dan did all the pricing up, which includes the daily hire fee, the distance charge, extras to be included such as bedding and kitchen pack, we decided on Cruise Canada.


When to Travel
Our Ultimate Canadian Rocky Mountains Motorhome Road Trip was in April and May, so mid to late Spring, where the weather was mild, snow still about but roads safe to drive. This did also mean not everything was open yet and some services were a little harder to find. We didn’t need to book the Motorhome too far in advance either, only about 4 weeks, and we didn’t book any campsites or tours in advance. (This would probably have to change if you were to do this road trip during peak time of End of May until Early September.)
If you were to travel this Road Trip in Summer, it would be a different experience, with more tourist activities open, less weather variable impacts and more people. You would also get less snow, less frozen lakes and have warmer summer type activities available.
If you were to travel in Winter, you would face some of the challenges we faced with facilities and services closed, attractions closed and even some road closures. The Icefields Parkway is known to close regularly in the winter due to avalanche risk. You would need to have an RV that was fully winterised (including water tanks), and you could definitely explore a lot of the Ski Resorts in the region too.

The Upsides
The bonuses we found adventuring at this time were plentiful. We got a cheaper price on the RV hire, we could free camp more often on our own, the tourist attractions weren’t packed full (& even then some of them still were and we cannot imagine being there in Summer) and we had beautiful snow capped mountains and snow sport opportunities as we went.


The Downsides
There are always compromises, and doing the trip in Spring caused a lot of attractions to be closed, so we did miss a few things we wanted to do (but saying this, we didn’t have too much spare time to add many more in any way), services such as water fill up were a little trickier, it was cold, quite cold on some occasions, and we missed out on seeing some of the lakes in their glacial blue prime.

Logistics
There are a few logistics and ‘life admin’ that need to take place on any motorhome or RV trip. Here are our tips for Road Trip logistics and ‘life admin’.
Finding campsites: We used the WikiCamps Canada and Park4Night apps to find our free camps, water fill up points and dump stations. Rubbish disposal was also readily available at most service points, picnic areas and campgrounds. Due to bears in all areas, all rubbish must be disposed of appropriately and into the bear proof bins.
Finding groceries: The bigger towns were better naturally, and grocery quality and price varied greatly. Some things were good in one shop, and not in another. We would recommend Walmart as a good starting point for average quality and reasonable price. Once you get into the smaller towns like Lake Louise and even Banff, you will quickly regret not buying more groceries at the big towns! They get very expensive.
Locating fuel and Propane Gas refill: Fuel (Gas) was easy, but propane a little trickier. Most gas stations that had Propane had a large clearly marked tank, and we found it was more common once you left the bigger towns.
Phone reception: Canada is big, and well, it has a lot of mountains. Phone reception is mediocre at best, no matter the carrier. There are 3 main ones, and we purchased a data sim for the largest 2, so we had as much reception as there was available. It was still very very spotty, and we wouldn’t recommend counting on it once you leave a town.
Tips for Hiring a Motorhome
Our tips generally refer to the Motorhome (RV) we hired with Cruise Canada however they may apply to any other hires you are doing.
- We paid for the bedding pack x2 (even though there are 3 of us) and it was weird. It meant 2 very very thin blankets big enough for one on each of the beds, but only 2 pillows. They were also so thin that we needed to double Aria’s up and buy another for us to use on top. The bed sheet didn’t even fit on the bed, it literally wasn’t big enough. Cruise Canada really cheaped out on this and it made for some uncomfortable nights until we went and purchased more bedding. Even the pillows were kid sized.
- Buy some rubber gloves to do the toilet emptying as they are not provided and it is gross.
- We also paid for the kitchen pack and there were items missing that we didn’t notice until a couple days in, so check it all before you depart from the pick up depot. This includes any chairs you are provided and power cords and hoses. We had a chair that was broken (again paid for 2 chairs to hire and couldn’t use one) and the power cable plug was bent so wouldn’t go into the sockets. Again we didn’t notice as we free camped for the first 9 days. We ended up purchasing from a thrift shop a grater, peeler and decent sized frypan, and donated them at the end of our trip.
- The battery systems in them are terrible, barely enough to run off grid overnight with the cooking and lights, barely enough for the heating to last either. There aren’t many power points so make sure you can charge most of what you need off USB-C, buy a small can-inverter and remember to take travel adaptors. The motorhomes from Cruise Canada are designed to really go from campsite to campsite, not to free camp in at all. You can make do, but it’s not pleasant.
- You would think things like a dish cloth, a bit of dish soap, broom etc would be standard but they aren’t. Therefore you have to buy a new one of each in your first groceries shop or you cannot get the dirt out of the van. Luckily ours had a broom included in the kitchen pack but check if it is included and if not ask about one (no dustpan though).
- Heating in Winter cannot be done through the aircon unit when connected to power (even though the dial has it, it requires an extra optional heater unit which Cruise Canada did not opt to add.). Therefore you need to use your propane heating, even if on an electric hook up site.
RVing with Kids
If you are doing this road trip with kids (of school age) then pop into the information centres for the free, engaging and informative activity books. We were able to collect an activity book for the 6 regions (Jasper National Park, Icefields Parkway National Park, Banff National Park, Lake Louise, Kootenay National Park and Yoho National Park). We missed out on Glacier National Park as the office was still closed. You can collect the activity books from a couple of the different locations and then return them to others too, making one-way trips still do-able. Once complete (or mostly complete), pop back in to the Info Centres, have the certificate signed off and collect your National Park Dog-Tag. There are opportunities to do more activity books and collect the tags at almost all of Canada’s National Parks. Our Aria absolutely loved completing the books, looking for and researching the next location and activity and learning so much about each area, I’m sure your kids would love it too!


Our Itinerary
Keep in mind the time of year we travelled, this affects what is open and available to do. I will add some additional points of interests we missed due to either weather, time or availability for if you have more time and/or travel at a different time and want to investigate these other POIs.
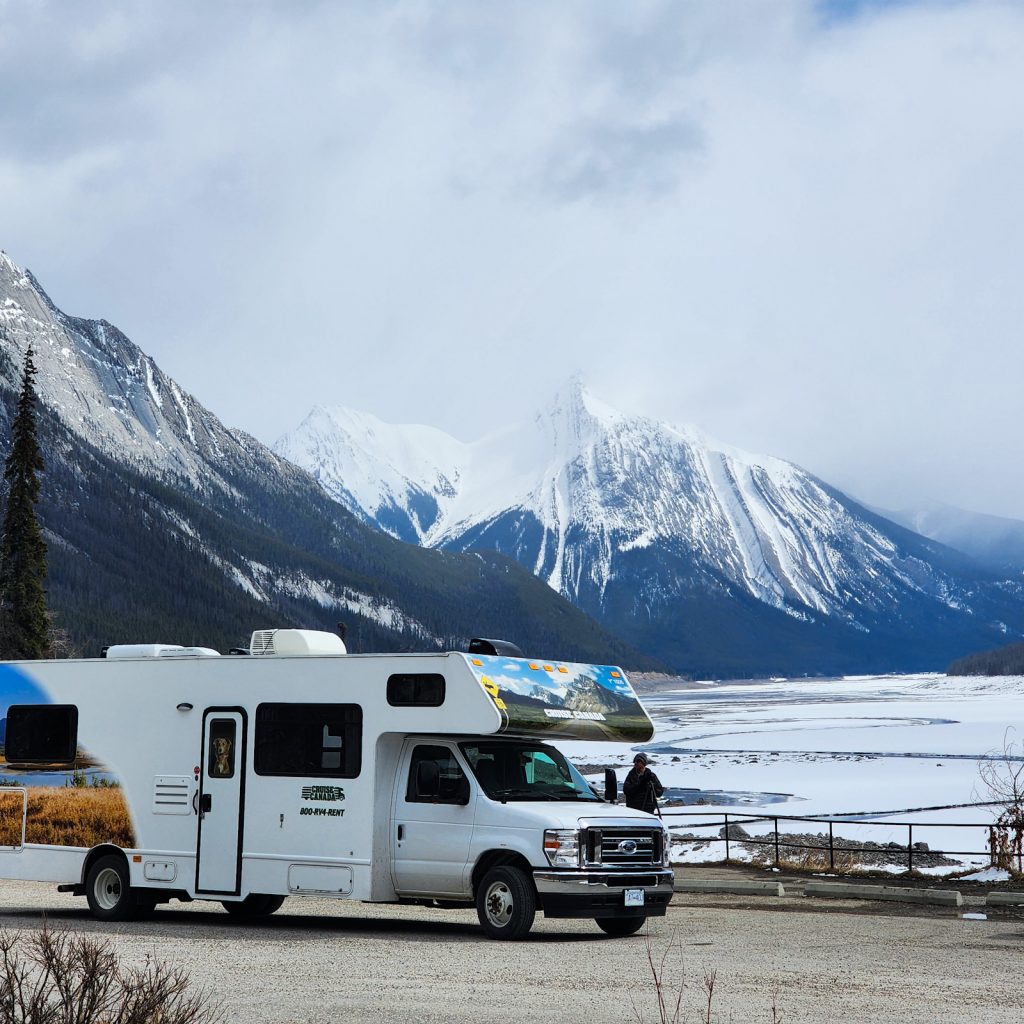
Day 1: Collect your Motorhome from Vancouver and hit the road.
Carefully drive out of Vancouver, it is a little busy at times. Take the Sea to Sky Highway from Vancouver to Whistler. We didn’t have time to stop (& we have previously done this road) but make stops at Porteau Cove Road Lookout and Shannon Falls. Camp at The Gravel Pitt on Rethel Creek. This free camp is by a beautiful river, with a picnic table, (but the mice are friendly) and you got to drive past the stunning Green Lake every day, make sure you stop for a photo here too.


Day 2 & 3: Explore and Enjoy Whistler Blackcomb
We went snowboarding in Whistler for a couple of days. Whistler is our favourite ski-mountain in the world (We’ve done a few now). If you are not into skiing or snowboarding (or your not here in the right season, there is still so much to do in this wonderful place, that you will be entertained for a couple of days easily. Other activities include Peak to Peak Gondola, lake walks such as Lost Lake, village walks, bear watching, mountain biking, Whistler Museum, the Whistler Sliding Centre, Zip-Lining, sup or kayak the lakes, etc just to name a few (see our Whistler Guide coming soon for more information). Return to camp at The Gravel Pit at Rethel Creek.


Day 4: Drive to Lake Duffey Lake Stop for a hike Joffre Lake.
Joffre Lakes Hike is a strenuous hike and only available in the summer as parking for RVs is not available while snow is on the road or parking area. We couldn’t do this hike but have heard so many great things about it. You can also stop at Nairn Falls if you like, we didn’t but again heard they are great.
We had impeccable weather and loved the view at Lake Duffey that much that we camped by it for the night. We enjoyed a fire and stunning view. There is only a small boat ramp area and there were no ‘no camping’ signs, so you will have to make the call as to how busy/quiet it is when you’re visiting as to if it is an appropriate campsite for the night.
The aboriginal name for Duffey Lake was “tek” which means “log jam”, referring to the natural log jam at the East end of the lake, it is impressive from the ground, but you really do get a perspective of its size from the air.


Day 5: Drive North toward Lillooet and Kamloops and then continue North towards Clearwater. Stop at Seton Lake, before making your way to Kamloops.
We stopped at Steelhead Provincial Park Campground for a picnic lunch. This was ok since it was quiet season, but may not be possible in peak season. Kamloops is where you should restock on groceries (and stock up as much as you can for your trip as it is the cheapest place with the most options, plus fuel and gas). We then suggest finding a free camp/ rest area about 30minutes north of Kamloops to rest for the night.
Nestled in the picturesque Squamish-Lillooet region of southwestern British Columbia, Seton Lake is a breath-taking freshwater fjord that captivates visitors with its stunning beauty. It is fed by glacial runoff, resulting in its stunning blue hue. Seton Lake stretches an impressive 21.9 kilometres in length and averages 1.1 kilometres in width. The mean depth is 106.2 metres and maximum depth is 460 metres.


Day 6: Continue North making your attraction stops Spahats Creek Falls and Shaden Viewpoint. Continue to another mountain free camp – Canoe Reach.
Sapahat Creek Falls and Shaden Viewpoint are both short forest walks to lookouts – a waterfall and valley view respectively. Both are worth the stop if you have the time. Be aware that the carparks are small though so you will need to be prepared to reverse back if there is no room.
Normally there is a lake view at Canoe Reach, but there hasn’t been enough snow melt yet. We had a campfire and cooked marshmallows and hoped they wouldn’t attract any bears. We are always on the lookout for bears and wildlife as we are regularly camped amongst the forest and in their home, luckily no bear encounters yet.


Day 7: Drive to Jasper. Stop at Rearguard Falls, Mt Robson, Overlander Falls. Camp at Wapiti Campground.
Rearguard Falls are stunning and are the furthest point the Chinook, largest of the Pacific salmon, travel to, for spawning. These fish have survived several years at sea to return to the river of their birth, the mighty Fraser. From its estuary in British Columbia’s lower mainland to this point, the Chinook have travelled upstream over 1200km. Some may be successful battling over these falls to reach the gravel above, but for most, Rearguard Falls marks the end of their journey.
Next, stop by Mt Robson, The Canadian Rocky Mountains’ Tallest Mountain. You can do a series of walks here if you have the time, energy and right weather conditions. We just went for a 10 minute walk in the forest.
Next is Overlander Falls, it is a lovely 45 minutes return, easy hike lined by wonderful big trees, moss and a variety of wildflowers. The water drops about 10 meters into a very large and nice pool and then runs over rapids through the magnificent canyon.
The waterfall has been named for the Overlanders expedition of 1862. About 70 men and only 1 woman from Fort Garry (now Winnipeg) travelled across the prairies and through the Rocky Mountains at what is now Mt Robson Provincial Park, intending to reach the Barkerville or Cariboo goldfields.
Continue driving to Jasper and camp the night at the Wapiti Campground.


Day 8: Stay in Jasper, wander the town, visit the Info Centre, stop in at the Bakery, explore Pyramid Lake Island
Dan found a bakery! Bear Paw Bakery (recommended by a local we met on a Whistler chair lift). So of course he had to try the Bear Paw and the sausage rolls were fresh out of the oven, so he got one of those too. To my surprise they had a gluten free muffin too, and it was delish! Expensive as though!
Our first stop for exploring after dropping into the Information Centre was Pyramid Lake. With a lot of the NP closed still due to weather. The info centre highly recommended Pyramid Lake.
Pyramid Lake and Island, Jasper National Park, you are beautiful!! Pyramid lake is a beautiful short drive out of town and a 5 minute flat walk. There are many vantage points on the island to get a great view of Pyramid Mountain.


Day 9: Stay in Jasper – go to Fort Walk and Lake Edith
The Old Fort Walk was another recommended hike from the info centre and it is also just on the edge of town. The walk starts up a steep hill, giving great views over the town and the surrounding mountains, before descending into the forest. We were once again on bear watch as they have been spotted around town regularly.
We also found a set of the famous Canadian Red Chairs, which started off Aria’s chair hunt and some friendly mountain sheep.
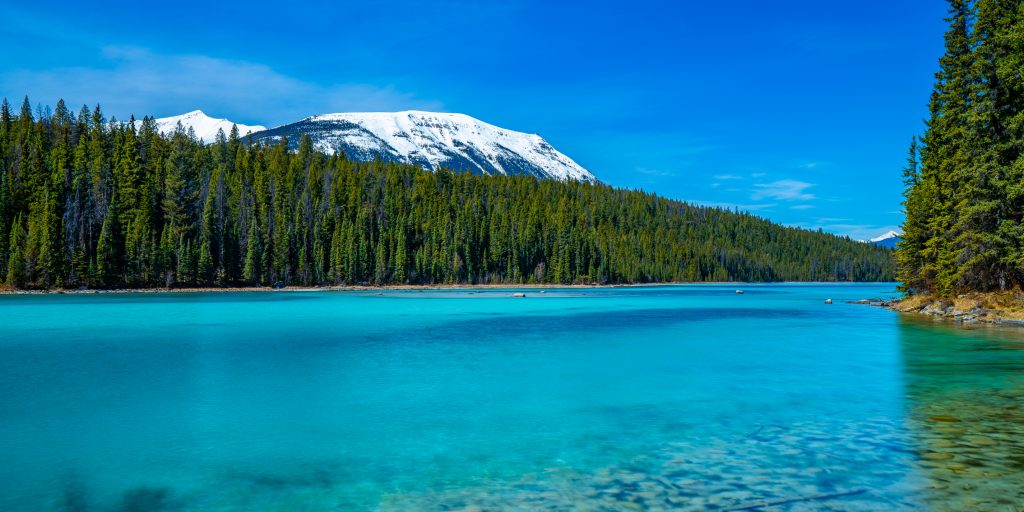
Next, stop in at Lake Edith as it is on the way to camp and I was dying to see a blue lake that everyone keeps talking about & it did not disappoint! Aria and I thoroughly enjoyed the view while Dan did some photography.
On the way out we saw elk and lots of them. This one stood still long enough for us to take a pic. We even had to stop on the highway for a herd to cross the road! You are almost guaranteed to see elk in Jasper apparently.
The Wapiti Campground which is just out of town and has amazing playground views! Plus the river behind our site gave us a lovely sunset view! Dan captured another beauty in this place! The Athabasca River is the longest river in Alberta (1,538 km) and eventually makes its way to the Arctic Ocean. If you get a nice sunset, pop down to the river and just enjoy!


Day 10: Stay in Jasper, drive go to Maligne Canyon, Maligne Lake and Medicine Lake
Maligne Canyon, another natural wonder in the gorgeous region of Jasper. We took the short and easy 3km return walk along this gorge and found many beautiful vantage points, frozen waterfalls and hidden pockets of wonder. When the water isn’t frozen at the bottom, apparently it is a gorgeous blue colour due to the glacial water flow.
You can continue along the walk further and also take guided tours into the canyon in the summer time, once there isn’t as much ice and also not too much waterflow.
Continuing along the Maligne Lake drive, enjoying the scenery and watching for wildlife. This road is apparently a popular wildlife spotting area, from bears to Moose to Elk and Big Horn Sheep. We spotted a rare Pine Marten (a member of the weasel family – which we only knew as we took the photo back to the info centre to help us identify it!) and unfortunately the only other animals seen were sheep.
While driving it started snowing and when we arrived it continued. We sat in the RV and had lunch, enjoying the views, waiting for the snow to pass. Once done, we walked out onto the lake while it was frozen, which is a really odd feeling and we were in AWE! In the summer this lake is a stunning blue and they run boat tours too. There is a short walk here too in the summer, it was a bit too icy for us without the proper footwear (cleats) so we passed on this one.


Day 11: Leave Jasper. Stop at the Valley of the 5 Lakes walk then continue down Icefields Parkway Drive.
Valley of the 5 Lakes Walk, Jasper National Park brought the goods. 2 out of 5 were thawed and blue, the other 3 still frozen. We also found some more red chairs. This walk took us a couple of hours, so you do need to get a reasonable start on the day in the morning.
Driving the Icefields Parkway – one of the most famous road trips in Canada and the World, and you will see why from these pics. It is absolutely incredible, spectacular and amazing!!
We made stops at everything we could, not everything was open due to the weather, but we made the most of what we could and are not disappointed as simple just driving this road is magnificent! You may be able to make a couple of extra stops, but the amount we did filled our day well.
We stopped at Athabasca Pass Lookout, Athabasca Falls, Goats & Glacier Lookout (no goats were seen, just glaciers), Sunwapta Falls and Stutfield Glacier Viewpoint.
The halfway point of the Icefields Parkway drive, the Icefields Glacier Lookout. It was one of those “once in your life experiences” for us. Being surrounded by glaciers everywhere we looked, mountains towering above us, snow all around and absolutely freezing cold. We enjoyed a careful walk on the frozen and snowy river, and an evening drink to mark the moment into our memories.
We even spotted an avalanche happening at the Stutfield Glacier Viewpoint as we were driving today, something we were glad was off in the distance and that we didn’t see while on the snow slopes for the season. The Jasper info centre person told us about an area that they occur regularly in the right conditions, which just happened to be on the day we were driving past too, so we kept an eye out.
We camped the night at the Icefields Glacier Lookout on the gravel section, off from the main parking area. This is not a legitimate camp, however it was almost 7pm, we were tired, it was quiet and off season so we stayed here and left no trace. There are no campgrounds open in the winter along the Icefields Parkway, so we didn’t have any other nearby option, however in the summer there are a couple of National Park Campgrounds to choose from and the Columbia Icefield Campground is just 1 minute up the road. It got to -15c overnight here!


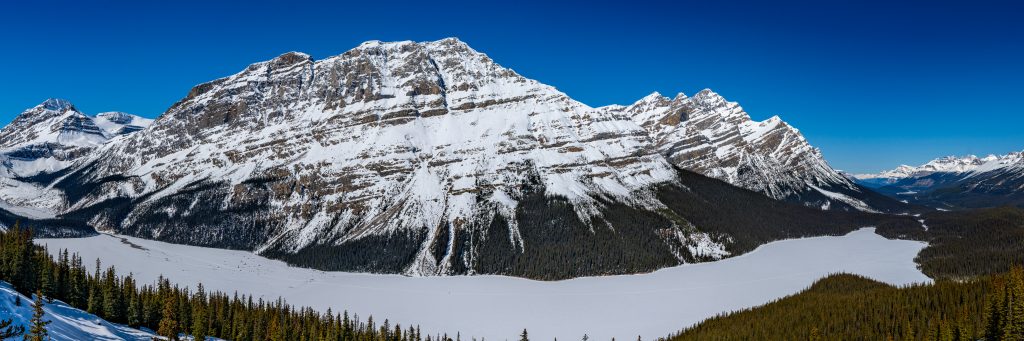
Day 12: Day 2 of Icefields Parkway Drive. Stop at Lake Louise Info Centre and Camp at Lake Louise
We continued along the drive, continuing to be amazing and stopped in at as many POI we could. We visited The Big Bend, Peyto Lake and Bow Lake (Icefields Parkway South Section).
Peyto Lake was our favourite stop out of these three. It was a short 20minute walk (& a little icy underfoot) but so worth the lookout over the lake. You can do more walks around this area too if you have the time and gear.
Bow Lake was on the side of the road, we didn’t even have to get out of the RV if we didn’t want to. I believe you can do walks here too but we were happy with the roadside view.
We continued to Lake Louise, stopping at the information centre first.
Lake Louise is the iconic Lake that everyone talks about when you think of Banff and Canadian Rockies. It is a beautiful, stunning lake and mountain view with the perfect balance and a bit of wow factor with the frozen waterfall at the end. BUT, we also think it is a little overpopulated and takes away from the beauty. The crowds here, out of season, on a week day, in the middle of the day, were crazy. We literally cannot imagine visiting on a weekend or worse, a weekend/school holidays in summer.
We walked across the frozen lake, down to the frozen waterfall and then back along the path on the side. Morraine Lake is another well known and beautiful lake in the area. If you have the time spare, look into a trip to this one too (sometimes of the year it is closed, others you can only visit by bus).
We camped the night at the Lake Louise Campground. It was a nice National Park camp with great facilities. We enjoyed the company of some fellow Aussies here and enjoyed a drink in the sun.


Day 13: Drive Bow Valley Parkway & Johnson Canyon on the way to Banff. Camp at Tunnel Mountain Campground Banff
You could take the highway to Banff from Lake Louise, or you could drive the Bow Valley Parkway. Of course, we chose the scenic Bow Valley Parkway and made a couple of stops along the way and we suggest you do too!
Johnson Canyon was spectacular. The blue glacial water, the cave and half frozen falls and finally the huge frozen falls at the upper canyon, it didn’t disappoint. The line up for the cave and waterfall view was 30 minutes long, again not peak time or season etc, so we can’t imagine how long you’d have to wait in the peak.
Head to Camp at Tunnel Mountain Campground. Another great National Park Camp and a stunning location.


Day 14: Stay in Banff and go to The Cave & Basin National Historic Site and take a wander around town, visit the info centre
Where Canada’s National Parks began, The Cave & Basin National Historic Site in Banff! Located in the heart of Banff National Park, this piece of important history was fascinating. We jumped onto the free guided tour after getting free entry with our National Parks Pass (double bonus we didn’t know about the tour happening just timed it well, from memory it was about 1pm). We were able to immerse ourselves in the rich history as we explored the cave where it all began, and learn about the early days of conservation in Canada.
It was here in 1883 that three Canadian Pacific Railway workers discovered the natural hot springs, which led to the establishment of Banff National Park in 1885, the first national park in Canada and the third in the world.
The thermal hot springs (reminded us of Winton, QLD water if you know what I mean) but even though there was the ‘scent’, the site quickly became a popular tourist destination. By the late 1800s, the federal government had built bathing facilities to accommodate visitors coming to experience the therapeutic properties of the hot springs.
This was until researchers found that the Cave and Basin is home to the Banff Springs Snail, a species that is found nowhere else in the world. This tiny snail, which measures only a few millimetres in length, inhabits the thermal springs at Cave and Basin, it is listed as an endangered species due to its very limited habitat and the delicate nature of its environment. This tiny snail has adapted to the unique conditions of the hot springs and plays a crucial role in the ecosystem.
After our history lesson, we wandered through town, found the Info Centre, checked out some shops and found the Fudge Shop. We of course had to take a few home to try, they all looked great.


Day 15: Stay in Banff, hike Tunnel Mountain and visit Bow Falls lookout.
Just a couple minutes drive from the campground is a short but steep walk up Tunnel Mountain. It provides a beautiful forest walk and stunning views in all directions once at the top. We found some more red chairs too!
After the hike, we drove another short distance to Bow River Falls and Lookout area. We had stunning weather and made a picnic lunch to enjoy the view.
Back to camp for a restful afternoon.


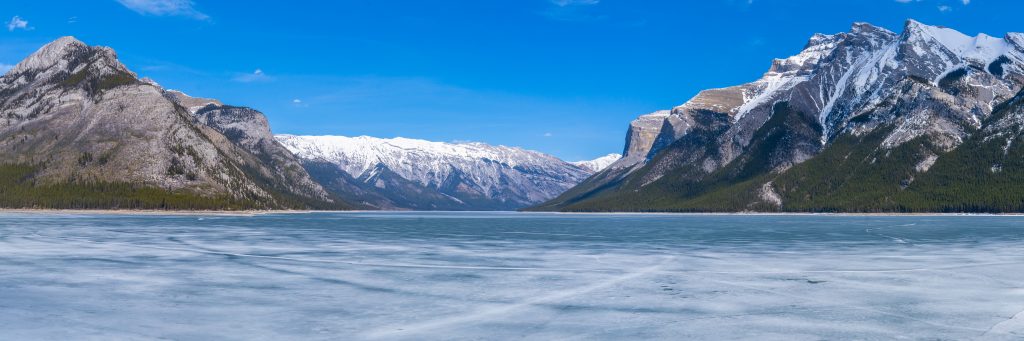
Day 16: Stay in Banff and day trip Banff Lakes Drive – Two Jacks Lake, Lake Minnewanka and Cascade Ponds.
Lakes Drive, Banff, simply more amazing scenery! We started off at Two Jacks Lake and hopped across some rocks to the island, overlooking the almost completely frozen lake back towards the mountains around Banff. We found more red chairs to tick off the list and got chased by some geese!
We then continued along to Lake Minewanka, a huge lake again frozen and surrounded by mountains. It was here that we did some investigating of the ice layer and discovered that when impacted breaks into mini icicles. It was a good 30minutes of fun, watching and listening to it break every time we kicked it. This lake in the summer would be a great place for a boat tour too, it is huge and I can imagine it being a beautiful colour.
We finished our drive at Cascade Ponds, lakes that were not frozen and that were a stunning shade of blue, with towering mountains basically at the shoreline.


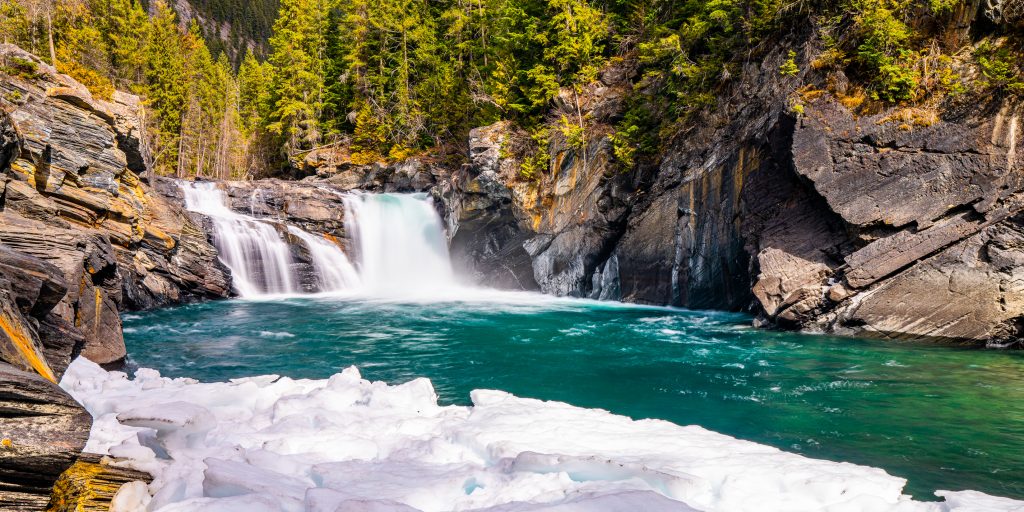
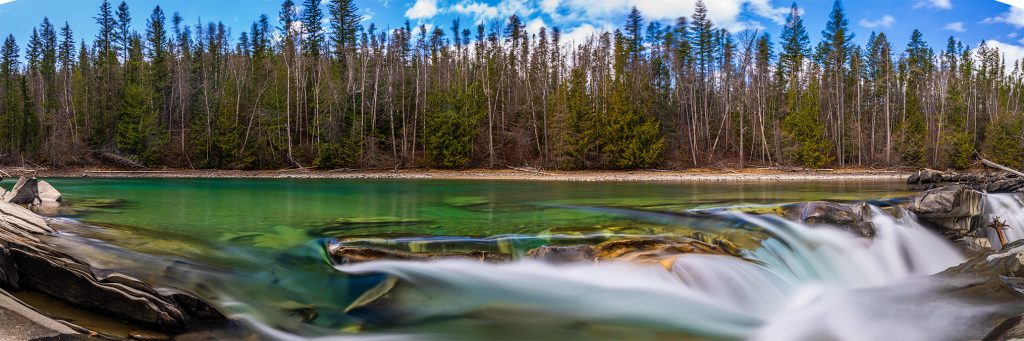
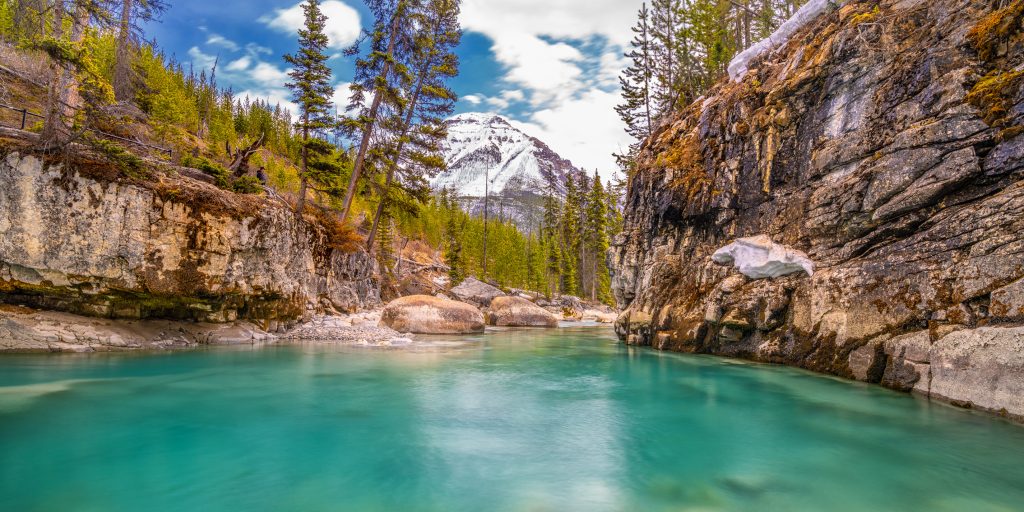
Day 17: Visit Kootenay National Park stopping at Marble Canyon and Numa Falls. Back track to Lake Louise Campground.
The lesser known and popular Kootenay National Park, is just as impressive as Jasper and Banff. There were snowy mountains, gorgeous blue water rivers and gorges, beautiful pine trees and lovely views in this NP!
We stopped in at Marble Canyon for a short hike and enjoyed the experience, which gave us much more than we expected. It was an easy walk, crossing the gorge over a number of bridges and we ended up spending about an hour exploring here. Daniel really loved the photographic opportunities at the base of this canyon, as you can see below.
Next down the road about 20 minutes was Numa Falls – what a hidden gem! This gorgeous short walk, with a stunning picnic area with more amazing views, really turned on the goods, check this out!! I will let the photos speak for themselves, but it is a must in our opinion. Again in the non-snowy months you can take some hikes here of all different lengths and difficulties. There is more to Kootenay National Park, but the rest was closed for our visit so we headed back to Lake Louise Campground for the night. You can however continue along the National Park to Radium Hot Springs, which is apparently a lovely small town with lots of natural hot springs to explore.


Day 18: Visit Yoho National Park stopping at Natural Bridge and Emerald Lake. Continue through to Golden and Waitabit Creek Campground Riverside Camp
Yoho National Park, another beauty and our last National Park stop. Not much was open unfortunately due to the weather, but we stopped in at Natural Bridge and Emerald Lake.
Natural Bridge was beautiful and Emerald Lake, still just slightly frozen, but you can see the potential for it to live up to it’s name. Neither of these attractions required any hiking from the carpark and were only a short 10-15minute stop each.
Waitabit Campground is only a short 30minute drive from Golden. It is right next to a gorgeous blue river where there are about 10 campsites. Each with picnic tables and firepits, plus there are drop toilets and firewood available for use too. We absolutely loved this camp and know you will too.


Day 19: Drive through Glacier National Park and visit Kamloops Wildlife Park
We stopped at the Glacier National Park info centre to collect and complete the last kids activity book. It was a fantastic centre with fun activities and heaps of interactive info opportunities. This National Park isn’t as popular as others but deserves a visit if you have the time and are visiting in Summer. There was nothing open for us to do here (we had earmarked a couple of short boardwalks) hence the drive through only.
We continued through to BC Wildlife Park, we enjoyed watching the bears from a safe distance, seeing marmots, unique foxes, cougars and more! This wildlife park is a not-for-profit and only homes animals that cannot be in the wild for one reason or another. We thoroughly enjoyed our couple of hours here.
We drove another hour or so out of Kamloops, towards Vancouver, and found a free riverside gravel side camp to get us by for the night.


Day 20: A big drive day stopping at Bridal Veil Falls and Lynn Canyon.
On our final couple of days there was few days of a cold blast and snow in various regions of Canada and we got to have one last snow moment and drive in the white stuff on our way back toward Vancouver.
Once we got down the pass, and only 1.5 hour from Vancouver, this stunning waterfall and forest was a great lunch stop. Bridal Veil Falls – The amount of water coming down, in such an elegant way was amazing! We were standing a little way back and we were getting drenched.
We didn’t have time to stop at Lynn Canyon (but have done in the past) and highly recommend squeezing a stop in here. It is just as wonderful as the more popular Capilano Suspension Bridge, but free (just costs for parking I believe). From here make your way to Fort Langley Fort Camping Campsites for the night.


Day 21: Fort Langley
Step back in time at Fort Langley, the birthplace of British Columbia, located just outside Vancouver! This National Historic Site offers a fascinating glimpse into the region’s rich history and vibrant heritage and was our final stop on our Canada RV Road Trip.
Founded in 1827, Fort Langley was established by the Hudson’s Bay Company in 1827 as a fur trading post, strategically positioned on the Fraser River. In 1858, the discovery of gold in the Fraser River transformed Fort Langley into a bustling hub for gold prospectors, leading to the proclamation of the Colony of British Columbia.
You just need one morning or afternoon here, to wander around town and along the river next to the RV Park. This RV park was lovely with each site separated by trees, lots of large grass areas, playground and great amenities. It also gives you an opportunity to pack everything back into your suitcases and clean up the Motorhome ready to return the next morning. The location to Vancouver means you’re not driving too far before having to return the MH and they have all the facilities you need such as propane refill and rubbish.


Our Statistics:
- 21 Nights
- Campsites: 9 nights paid, 12 nights free
- Fuel usage: 24L/100km
- KM Travelled 2560
- 1 Hour of generator use (charged at $3/hour plus fuel = ~$11/hour)
- 1 Paid Dumping station and water fill ($5)
- 4 gas refills (tank is a 20kg tank).
- Temperatures: -15°C to 10°C

Our Costs:
- Motorhome Hire Cost: $3168
- Campsite Fees: $390
- Groceries & Eating Out: $1613
- Fuel and Gas: $1477
- Other (insurance, phone e-sims, etc): $481
- TOTAL: $7129 = $339.50/night

If you enjoyed this blog or found it useful, please feel free to click on any of the ads on the page, it doesn’t cost you anything, but it does help us see a little money to cover the hosting costs of the website.
Further, if you are looking to support us in other ways, you can buy a product from our Travel Tools Page, purchase a piece of Dan’s photography art or ‘buy us a coffee“.
We also offer one-on-one travel consultations, via video calls. If you wish for further information, clarification or personalised advice for something specific to your travel needs, feel free to book a session to chat with us.
If you’re looking for more helpful information for international trips, you can check out our other blogs such as E-sims and Location Guides. & Don’t forget to check out our YouTube Channel for our Vlogs and other helpful information, especially travelling Europe and UK via Airbnb!
Disclaimer: I may make a small commission if you buy from our links on our website, it just helps us cover the costs of the website to have this info available for you and costs you nothing more.
Planning a Trip to Canada?
~ Hiring a car? We recommend getting a quote from DiscoverCars
~ Hiring a Motorhome? We recommend Motorhome Republic
~ Arranged your Travel Insurance? We recommend SafetyWing
~ Booked your accommodation? We use Expedia or Airbnb or TrustedHouseSitters
~ Need a house or Pet Sitter while you’re away? We recommend finding a Trusted House Sitter.
~ Got your E-Sim sorted? We use MobiMatter to stay in touch!
~ Organised your spending money? We use WISE to get the best rate with the lowest fees!
~ Booked your flights? We use SkyScanner to find the best deals!
Hi, love your post and photos! How do you keep the water tank in your motorhome not to freeze? We are thinking of travelling this end Sep 2025 for 18 days of motorhome/campervan hire. Is there thing we should skip since we cannot follow your 21 days itinerary!
Hi Tricia, thanks very much! Glad you found the info helpful 🙂 Most water tanks are inside the vehicles so they should be relatively protected from the cold and freezing as inside it kept warmer, it is more the pipes etc that can freeze. If you are travelling in September/October, I don’t think you will face the freezing temperatures too much that it will be a problem. in terms of places to skip if you have to, I would only do 1 day at Whistler/Blackcomb at that time of year, I would skip Day 6 and Day 21 of our Itinerary and squish Day 8 & 9 onto 1 day. Hope that helps! Happy to talk you through more if you’d like, feel free to book an online consultation with us 🙂
We are planning on doing just about the same trip while renting an RV from Cruise Canada so this article helped us a lot. THANKS! Good to know to double check items provided by them.
What type of child car seat did you use? On the videos from Cruise Canada I see there is only lap belt on the rear seating, while our car seat needs LATCH or 3 point seatbelt.. did you run into this issue?
Also my understanding is that with the generator, the Large RV can be self sufficient until it runs out of gas.
How exciting Matt, it is such an incredible trip!! I am glad you have found the info helpful 🙂
Our child seat is a booter type seat that uses the car seatbelts, so yes she just had a lap belt across her while sitting in the seat at the table facing forward. I am not sure if they have other options in the rental vehicles or additional belts that can be added etc to suit your seat, that may be a question for Cruise Canada.
And yes, with a generator it will be self-sufficient but the generator is loud and uses quite a bit of fuel, so if you can plan your power use and charge while driving etc that is what we preferred and seemed to manage ok. 🙂